1540 lines
51 KiB
Markdown
1540 lines
51 KiB
Markdown
|
||
# Vuls: VULnerability Scanner
|
||
|
||
[](http://goo.gl/forms/xm5KFo35tu)
|
||
|
||

|
||
|
||
Vulnerability scanner for Linux/FreeBSD, agentless, written in golang.
|
||
|
||
[README in English](https://github.com/future-architect/vuls/blob/master/README.md)
|
||
Slackチームは[こちらから](http://goo.gl/forms/xm5KFo35tu)参加できます。(日本語でオッケーです)
|
||
|
||
[](https://asciinema.org/a/bazozlxrw1wtxfu9yojyihick)
|
||
|
||

|
||
|
||
----
|
||
|
||
# Abstract
|
||
|
||
毎日のように発見される脆弱性の調査やソフトウェアアップデート作業は、システム管理者にとって負荷の高いタスクである。
|
||
プロダクション環境ではサービス停止リスクを避けるために、パッケージマネージャの自動更新機能を使わずに手動更新で運用するケースも多い。
|
||
だが、手動更新での運用には以下の問題がある。
|
||
- システム管理者がNVDなどで新着の脆弱性をウォッチし続けなければならない
|
||
- サーバにインストールされているソフトウェアは膨大であり、システム管理者が全てを把握するのは困難
|
||
- 新着の脆弱性がどのサーバに該当するのかといった調査コストが大きく、漏れる可能性がある
|
||
|
||
|
||
Vulsは上に挙げた手動運用での課題を解決するツールであり、以下の特徴がある。
|
||
- システムに関係ある脆弱性のみ教えてくれる
|
||
- その脆弱性に該当するサーバを教えてくれる
|
||
- 自動スキャンのため脆弱性検知の漏れを防ぐことができる
|
||
- CRONなどで定期実行、レポートすることで脆弱性の放置を防ぐことできる
|
||
|
||

|
||
|
||
----
|
||
|
||
# Main Features
|
||
|
||
- Linuxサーバに存在する脆弱性をスキャン
|
||
- Ubuntu, Debian, CentOS, Amazon Linux, RHEL, Raspbianに対応
|
||
- クラウド、オンプレミス、Docker
|
||
- OSパッケージ管理対象外のミドルウェアをスキャン
|
||
- プログラミング言語のライブラリやフレームワーク、ミドルウェアの脆弱性スキャン
|
||
- CPEに登録されているソフトウェアが対象
|
||
- エージェントレスアーキテクチャ
|
||
- スキャン対象サーバにSSH接続可能なマシン1台にセットアップするだけで動作
|
||
- 非破壊スキャン(SSHでコマンド発行するだけ)
|
||
- AWSでの脆弱性/侵入テスト事前申請は必要なし
|
||
- 設定ファイルのテンプレート自動生成
|
||
- CIDRを指定してサーバを自動検出、設定ファイルのテンプレートを生成
|
||
- EmailやSlackで通知可能(日本語でのレポートも可能)
|
||
- 付属するTerminal-Based User Interfaceビューアでは、Vim風キーバインドでスキャン結果を参照可能
|
||
- Web UI([VulsRepo](https://github.com/usiusi360/vulsrepo))を使えばピボットテーブルのように分析可能
|
||
|
||
----
|
||
|
||
# What Vuls Doesn't Do
|
||
|
||
- Vulsはソフトウェアアップデートは行わない
|
||
|
||
----
|
||
|
||
# Setup Vuls
|
||
|
||
Vulsのセットアップは以下の3パターンがある
|
||
|
||
- Dockerコンテナ上にセットアップ
|
||
see https://github.com/future-architect/vuls/tree/master/setup/docker
|
||
[日本語README](https://github.com/future-architect/vuls/blob/master/setup/docker/README.ja.md)
|
||
- Chefでセットアップ
|
||
see https://github.com/sadayuki-matsuno/vuls-cookbook
|
||
- 手動でセットアップ
|
||
Hello Vulsチュートリアルでは手動でのセットアップ方法で説明する
|
||
|
||
----
|
||
|
||
# Hello Vuls
|
||
|
||
本チュートリアルでは、Amazon EC2にVulsをセットアップし、自分に存在する脆弱性をスキャンする方法を説明する。
|
||
手順は以下の通り
|
||
|
||
1. Amazon Linuxを新規作成
|
||
1. 自分自身にSSH接続できるように設定
|
||
1. 必要なソフトウェアをインストール
|
||
1. go-cve-dictionaryをデプロイ
|
||
1. Vulsをデプロイ
|
||
1. 設定
|
||
1. 設定ファイルと、スキャン対象サーバの設定のチェック
|
||
1. Scan
|
||
1. Reporting
|
||
1. TUI(Terminal-Based User Interface)で結果を参照する
|
||
1. Web UI([VulsRepo](https://github.com/usiusi360/vulsrepo))で結果を参照する
|
||
|
||
## Step1. Launch Amazon Linux
|
||
|
||
- 今回は説明のために、脆弱性を含む古いAMIを使う (amzn-ami-hvm-2015.09.1.x86_64-gp2 - ami-383c1956)
|
||
- EC2作成時に自動アップデートされるとVulsスキャン結果が0件になってしまうので、cloud-initに以下を指定してEC2を作成する。
|
||
|
||
```
|
||
#cloud-config
|
||
repo_upgrade: none
|
||
```
|
||
|
||
- [Q: How do I disable the automatic installation of critical and important security updates on initial launch?](https://aws.amazon.com/amazon-linux-ami/faqs/?nc1=h_ls)
|
||
|
||
## Step2. SSH setting
|
||
|
||
ローカルホストにSSH接続できるようにする。
|
||
|
||
SSHキーペアを作成し、公開鍵をauthorized_keysに追加する。
|
||
```bash
|
||
$ ssh-keygen -t rsa
|
||
$ cat ~/.ssh/id_rsa.pub >> ~/.ssh/authorized_keys
|
||
$ chmod 600 ~/.ssh/authorized_keys
|
||
```
|
||
|
||
VulsはSSHパスワード認証をサポートしていない。SSH公開鍵鍵認証を使う必要がある。
|
||
また、パスワードありのSUDOもセキュリティ上の理由によりサポートしていないため、スキャン対象サーバに/etc/sudoersにNOPASSWDを設定して、パスワードなしでSUDO可能にする必要がある。
|
||
|
||
## Step3. Install requirements
|
||
|
||
Vulsセットアップに必要な以下のソフトウェアをインストールする。
|
||
|
||
- SQLite3 or MySQL
|
||
- git
|
||
- gcc
|
||
- GNU Make
|
||
- go v1.7.1 or later (The latest version is recommended)
|
||
- https://golang.org/doc/install
|
||
|
||
```bash
|
||
$ ssh ec2-user@52.100.100.100 -i ~/.ssh/private.pem
|
||
$ sudo yum -y install sqlite git gcc make
|
||
$ wget https://storage.googleapis.com/golang/go1.7.1.linux-amd64.tar.gz
|
||
$ sudo tar -C /usr/local -xzf go1.7.1.linux-amd64.tar.gz
|
||
$ mkdir $HOME/go
|
||
```
|
||
/etc/profile.d/goenv.sh を作成し、下記を追加する。
|
||
|
||
```bash
|
||
export GOROOT=/usr/local/go
|
||
export GOPATH=$HOME/go
|
||
export PATH=$PATH:$GOROOT/bin:$GOPATH/bin
|
||
```
|
||
|
||
カレントシェルに上記環境変数をセットする。
|
||
```bash
|
||
$ source /etc/profile.d/goenv.sh
|
||
```
|
||
|
||
## Step4. Deploy [go-cve-dictionary](https://github.com/kotakanbe/go-cve-dictionary)
|
||
|
||
```bash
|
||
$ sudo mkdir /var/log/vuls
|
||
$ sudo chown ec2-user /var/log/vuls
|
||
$ sudo chmod 700 /var/log/vuls
|
||
$
|
||
$ mkdir -p $GOPATH/src/github.com/kotakanbe
|
||
$ cd $GOPATH/src/github.com/kotakanbe
|
||
$ git clone https://github.com/kotakanbe/go-cve-dictionary.git
|
||
$ cd go-cve-dictionary
|
||
$ make install
|
||
```
|
||
バイナリは、`$GOPATH/bin`以下に生成される
|
||
|
||
|
||
NVDから脆弱性データベースを取得する。
|
||
環境によって異なるが、AWS上では10分程度かかる。
|
||
|
||
```bash
|
||
$ cd $HOME
|
||
$ for i in `seq 2002 $(date +"%Y")`; do go-cve-dictionary fetchnvd -years $i; done
|
||
... snip ...
|
||
$ ls -alh cve.sqlite3
|
||
-rw-r--r-- 1 ec2-user ec2-user 7.0M Mar 24 13:20 cve.sqlite3
|
||
```
|
||
|
||
## Step5. Deploy Vuls
|
||
|
||
新規にターミナルを起動し、先ほど作成したEC2にSSH接続する。
|
||
```
|
||
$ mkdir -p $GOPATH/src/github.com/future-architect
|
||
$ cd $GOPATH/src/github.com/future-architect
|
||
$ git clone https://github.com/future-architect/vuls.git
|
||
$ cd vuls
|
||
$ make install
|
||
```
|
||
|
||
vulsを既にインストール済みでupdateしたい場合は
|
||
|
||
```bash
|
||
$ go get -u github.com/future-architect/vuls
|
||
```
|
||
|
||
で可能である。
|
||
|
||
go getでエラーが発生した場合は、以下の点を確認する。
|
||
- Gitのバージョンがv2以降か?
|
||
- Go依存パッケージの問題でgo getに失敗する場合は [deploying with glide](https://github.com/future-architect/vuls/blob/master/README.md#deploy-with-glide) を試す。
|
||
|
||
## Step6. Config
|
||
|
||
Vulsの設定ファイルを作成する(TOMLフォーマット)
|
||
設定ファイルのチェックを行う
|
||
|
||
```
|
||
$ cd $HOME
|
||
$ cat config.toml
|
||
[servers]
|
||
|
||
[servers.172-31-4-82]
|
||
host = "172.31.4.82"
|
||
port = "22"
|
||
user = "ec2-user"
|
||
keyPath = "/home/ec2-user/.ssh/id_rsa"
|
||
|
||
```
|
||
|
||
## Step7. Check config.toml and settings on the server before scanning
|
||
|
||
```
|
||
$ vuls configtest
|
||
```
|
||
詳細は [Usage: configtest](#usage-configtest) を参照
|
||
|
||
## Step8. Start Scanning
|
||
|
||
|
||
```
|
||
$ vuls scan
|
||
... snip ...
|
||
|
||
Scan Summary
|
||
============
|
||
172-31-4-82 amazon 2015.09 94 CVEs 103 updatable packages
|
||
|
||
```
|
||
|
||
## Step9. Reporting
|
||
|
||
View one-line summary
|
||
|
||
```
|
||
$ vuls report -format-one-line-text -cvedb-path=$PWD/cve.sqlite3
|
||
|
||
One Line Summary
|
||
================
|
||
172-31-4-82 Total: 94 (High:19 Medium:54 Low:7 ?:14) 103 updatable packages
|
||
|
||
```
|
||
|
||
View short summary.
|
||
|
||
```
|
||
$ vuls report -format-short-text -cvedb-path=$PWD/cve.sqlite3 --lang=ja
|
||
|
||
172-31-4-8 (amazon 2015.09)
|
||
===========================
|
||
Total: 94 (High:19 Medium:54 Low:7 ?:14) 103 updatable packages
|
||
|
||
CVE-2016-5636 10.0 (High) CPython の zipimport.c の get_data 関数における整数オーバーフローの脆弱性
|
||
http://jvndb.jvn.jp/ja/contents/2016/JVNDB-2016-004528.html
|
||
https://access.redhat.com/security/cve/CVE-2016-5636
|
||
python27-2.7.10-4.119.amzn1 -> python27-2.7.12-2.120.amzn1
|
||
python27-devel-2.7.10-4.119.amzn1 -> python27-devel-2.7.12-2.120.amzn1
|
||
python27-libs-2.7.10-4.119.amzn1 -> python27-libs-2.7.12-2.120.amzn1
|
||
Confidence: 100 / YumUpdateSecurityMatch
|
||
|
||
... snip ...
|
||
````
|
||
|
||
View full report.
|
||
|
||
```
|
||
$ vuls report -format-full-text -cvedb-path=$PWD/cve.sqlite3 --lang=ja
|
||
|
||
172-31-4-82 (amazon 2015.09)
|
||
============================
|
||
Total: 94 (High:19 Medium:54 Low:7 ?:14) 103 updatable packages
|
||
|
||
CVE-2016-5636
|
||
-------------
|
||
Score 10.0 (High)
|
||
Vector (AV:N/AC:L/Au:N/C:C/I:C/A:C)
|
||
Title CPython の zipimport.c の get_data 関数における整数オーバーフローの脆弱性
|
||
Description CPython (別名 Python) の zipimport.c の get_data
|
||
関数には、整数オーバーフローの脆弱性が存在します。
|
||
|
||
補足情報 : CWE による脆弱性タイプは、CWE-190: Integer Overflow or Wraparound
|
||
(整数オーバーフローまたはラップアラウンド) と識別されています。
|
||
http://cwe.mitre.org/data/definitions/190.html
|
||
CWE-190 https://cwe.mitre.org/data/definitions/190.html
|
||
CWE-190(JVN) http://jvndb.jvn.jp/ja/cwe/CWE-190.html
|
||
JVN http://jvndb.jvn.jp/ja/contents/2016/JVNDB-2016-004528.html
|
||
NVD https://web.nvd.nist.gov/view/vuln/detail?vulnId=CVE-2016-5636
|
||
MITRE https://cve.mitre.org/cgi-bin/cvename.cgi?name=CVE-2016-5636
|
||
CVE Details http://www.cvedetails.com/cve/CVE-2016-5636
|
||
CVSS Claculator https://nvd.nist.gov/cvss/v2-calculator?name=CVE-2016-5636&vector=(AV:N/AC:L/...
|
||
RHEL-CVE https://access.redhat.com/security/cve/CVE-2016-5636
|
||
ALAS-2016-724 https://alas.aws.amazon.com/ALAS-2016-724.html
|
||
Package python27-2.7.10-4.119.amzn1 -> python27-2.7.12-2.120.amzn1
|
||
python27-devel-2.7.10-4.119.amzn1 -> python27-devel-2.7.12-2.120.amzn1
|
||
python27-libs-2.7.10-4.119.amzn1 -> python27-libs-2.7.12-2.120.amzn1
|
||
Confidence 100 / YumUpdateSecurityMatch
|
||
... snip ...
|
||
```
|
||
|
||
## Step10. TUI
|
||
|
||
Vulsにはスキャン結果の詳細を参照できるイカしたTUI(Terminal-Based User Interface)が付属している。
|
||
|
||
```
|
||
$ vuls tui
|
||
```
|
||
|
||

|
||
|
||
## Step11. Web UI
|
||
|
||
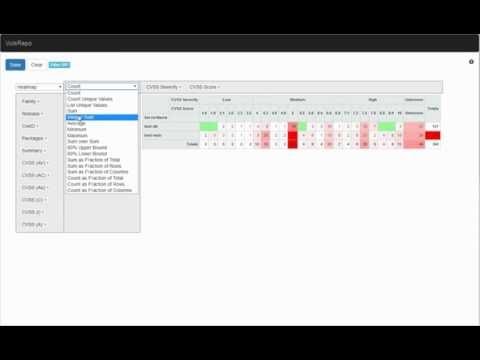
[VulsRepo](https://github.com/usiusi360/vulsrepo)はスキャン結果をビボットテーブルのように分析可能にするWeb UIである。
|
||
[Online Demo](http://usiusi360.github.io/vulsrepo/)があるので試してみて。
|
||
|
||
----
|
||
|
||
# Architecture
|
||
|
||
## A. Scan via SSH Mode (Remote Scan Mode)
|
||
|
||

|
||
|
||
## B. Scan without SSH (Local Scan Mode)
|
||
|
||
Vulsをスキャン対象サーバにデプロイする。Vulsはローカルホストにコマンドを発行する(SSH経由ではない)。スキャン結果のJSONを別サーバに集約する。スキャン結果の詳細化のためにはCVEデータベースへのアクセスが必要なので、事前にgo-cve-dictionaryをserver modeで起動しておく。
|
||
その集約サーバ上で、あなたはWebUIやTUIを用いて各スキャン対象サーバのスキャン結果を参照することが可能。
|
||
|
||

|
||
[詳細](#example-scan-via-shell-instead-of-ssh)
|
||
|
||
## [go-cve-dictionary](https://github.com/kotakanbe/go-cve-dictionary)
|
||
- NVDとJVN(日本語)から脆弱性データベースを取得し、SQLite3に格納する。
|
||
|
||
## Vuls
|
||

|
||
- SSHでサーバに存在する脆弱性をスキャンし、CVE IDのリストを作成する
|
||
- Dockerコンテナのスキャンする場合、VulsはまずDockerホストにSSHで接続する。その後、Dockerホスト上で `docker exec` 経由でコマンドを実効する。Dockerコンテナ内にSSHデーモンを起動する必要はない
|
||
- 検出されたCVEの詳細情報をgo-cve-dictionaryから取得する
|
||
- スキャン結果レポートを生成し、SlackやEmailなどで送信する
|
||
- スキャン結果をJSONファイルに出力すると詳細情報をターミナル上で参照可能
|
||
|
||
|
||
----
|
||
# Performance Considerations
|
||
|
||
- Ubuntu, Debian, Raspbian
|
||
`apt-get changelog`でアップデート対象のパッケージのチェンジログを取得し、含まれるCVE IDをパースする。
|
||
アップデート対象のパッケージが沢山ある場合、チェンジログの取得に時間がかかるので、初回のスキャンは遅い。
|
||
ただ、2回目以降はキャッシュしたchangelogを使うので速くなる。
|
||
|
||
- CentOS
|
||
アップデート対象すべてのchangelogを一度で取得しパースする。スキャンスピードは速い、サーバリソース消費量は小さい。
|
||
|
||
- Amazon, RHEL and FreeBSD
|
||
高速にスキャンし、スキャン対象サーバのリソース消費量は小さい。
|
||
|
||
| Distribution| Scan Speed |
|
||
|:------------|:-------------------|
|
||
| Ubuntu | 初回は遅い / 2回目以降速い |
|
||
| Debian | 初回は遅い / 2回目以降速い |
|
||
| CentOS | 速い |
|
||
| Amazon | 速い |
|
||
| RHEL | 速い |
|
||
| FreeBSD | 速い |
|
||
| Raspbian | 初回は遅い / 2回目以降速い |
|
||
|
||
----
|
||
|
||
# Use Cases
|
||
|
||
## Scan all servers
|
||
|
||

|
||
|
||
## Scan a single server
|
||
|
||
web/app server in the same configuration under the load balancer
|
||
|
||

|
||
|
||
----
|
||
|
||
# Support OS
|
||
|
||
| Distribution| Release |
|
||
|:------------|-------------------:|
|
||
| Ubuntu | 12, 14, 16|
|
||
| Debian | 7, 8|
|
||
| RHEL | 5, 6, 7|
|
||
| CentOS | 6, 7|
|
||
| Amazon Linux| All|
|
||
| FreeBSD | 10, 11|
|
||
| Raspbian | Wheezy, Jessie |
|
||
|
||
----
|
||
|
||
|
||
# Usage: Automatic Server Discovery
|
||
|
||
Discoveryサブコマンドは指定されたCIDRレンジ内でpingが返ってくるサーバを発見して、ターミナル上にVulsの設定ファイルのテンプレートを出力する。
|
||
|
||
```
|
||
$ vuls discover -help
|
||
discover:
|
||
discover 192.168.0.0/24
|
||
```
|
||
|
||
## Example
|
||
|
||
```
|
||
$ vuls discover 172.31.4.0/24
|
||
# Create config.toml using below and then ./vuls --config=/path/to/config.toml
|
||
|
||
[slack]
|
||
hookURL = "https://hooks.slack.com/services/abc123/defghijklmnopqrstuvwxyz"
|
||
channel = "#channel-name"
|
||
#channel = "${servername}"
|
||
iconEmoji = ":ghost:"
|
||
authUser = "username"
|
||
notifyUsers = ["@username"]
|
||
|
||
[email]
|
||
smtpAddr = "smtp.gmail.com"
|
||
smtpPort = "587"
|
||
user = "username"
|
||
password = "password"
|
||
from = "from@address.com"
|
||
to = ["to@address.com"]
|
||
cc = ["cc@address.com"]
|
||
subjectPrefix = "[vuls]"
|
||
|
||
[default]
|
||
#port = "22"
|
||
#user = "username"
|
||
#keyPath = "/home/username/.ssh/id_rsa"
|
||
#cpeNames = [
|
||
# "cpe:/a:rubyonrails:ruby_on_rails:4.2.1",
|
||
#]
|
||
#optional = [
|
||
# ["key", "value"],
|
||
#]
|
||
|
||
[servers]
|
||
|
||
[servers.172-31-4-82]
|
||
host = "172.31.4.82"
|
||
#port = "22"
|
||
#user = "root"
|
||
#keyPath = "/home/username/.ssh/id_rsa"
|
||
#cpeNames = [
|
||
# "cpe:/a:rubyonrails:ruby_on_rails:4.2.1",
|
||
#]
|
||
#optional = [
|
||
# ["key", "value"],
|
||
#]
|
||
#[servers.172-31-4-82.containers]
|
||
#type = "lxd" # or "docker"
|
||
#includes = ["${running}"]
|
||
#excludes = ["container_name", "container_id"]
|
||
```
|
||
|
||
このテンプレート使ってVulsの設定ファイルを作ってもよい。
|
||
|
||
----
|
||
|
||
# Configuration
|
||
|
||
- Slack section
|
||
```
|
||
[slack]
|
||
hookURL = "https://hooks.slack.com/services/abc123/defghijklmnopqrstuvwxyz"
|
||
channel = "#channel-name"
|
||
#channel = "${servername}"
|
||
iconEmoji = ":ghost:"
|
||
authUser = "username"
|
||
notifyUsers = ["@username"]
|
||
```
|
||
|
||
- hookURL : Incoming webhook's URL
|
||
- channel : channel name.
|
||
channelに`${servername}`を指定すると、結果レポートをサーバごとに別チャネルにすることが出来る。
|
||
以下のサンプルでは、`#server1`チャネルと`#server2`チャネルに送信される。スキャン前にチャネルを作成する必要がある。
|
||
```
|
||
[slack]
|
||
channel = "${servername}"
|
||
...snip...
|
||
|
||
[servers]
|
||
|
||
[servers.server1]
|
||
host = "172.31.4.82"
|
||
...snip...
|
||
|
||
[servers.server2]
|
||
host = "172.31.4.83"
|
||
...snip...
|
||
```
|
||
|
||
- iconEmoji: emoji
|
||
- authUser: username of the slack team
|
||
- notifyUsers: ここにユーザ名を指定すると、Slackで通知を受け取ることができる。たとえば `["@foo", "@bar"]`を指定すると、Slackのテキストに`@foo`と`@bar`が含まれるのでスマホなどにPush通知が可能。
|
||
|
||
- Mail section
|
||
```
|
||
[email]
|
||
smtpAddr = "smtp.gmail.com"
|
||
smtpPort = "587"
|
||
user = "username"
|
||
password = "password"
|
||
from = "from@address.com"
|
||
to = ["to@address.com"]
|
||
cc = ["cc@address.com"]
|
||
subjectPrefix = "[vuls]"
|
||
```
|
||
|
||
- Default section
|
||
```
|
||
[default]
|
||
#port = "22"
|
||
#user = "username"
|
||
#keyPath = "/home/username/.ssh/id_rsa"
|
||
#cpeNames = [
|
||
# "cpe:/a:rubyonrails:ruby_on_rails:4.2.1",
|
||
#]
|
||
#ignoreCves = ["CVE-2016-6313"]
|
||
#optional = [
|
||
# ["key", "value"],
|
||
#]
|
||
#[servers.172-31-4-82.containers]
|
||
#type = "lxd" # or "docker"
|
||
#includes = ["${running}"]
|
||
#excludes = ["container_name", "container_id"]
|
||
```
|
||
下記serversセクションで値が指定されなかった場合のデフォルト値
|
||
|
||
- servers section
|
||
```
|
||
[servers]
|
||
|
||
[servers.172-31-4-82]
|
||
host = "172.31.4.82"
|
||
#port = "22"
|
||
#user = "root"
|
||
#keyPath = "/home/username/.ssh/id_rsa"
|
||
#cpeNames = [
|
||
# "cpe:/a:rubyonrails:ruby_on_rails:4.2.1",
|
||
#]
|
||
#ignoreCves = ["CVE-2016-6314"]
|
||
#optional = [
|
||
# ["key", "value"],
|
||
#]
|
||
#containers = ["${running}"]
|
||
#[servers.172-31-4-82.containers]
|
||
#type = "lxd"
|
||
```
|
||
|
||
serversセクションの値は、defaultセクションの値よりも優先される。
|
||
defaultセクションの値を使いたい場合は `#` でコメントアウトする。
|
||
|
||
- host: IP address or hostname of target server
|
||
- port: SSH Port number
|
||
- user: SSH username
|
||
- keyPath: SSH private key path
|
||
- cpeNames: see [Usage: Scan vulnerability of non-OS package](https://github.com/future-architect/vuls/blob/master/README.ja.md#usage-scan-vulnerability-of-non-os-package)
|
||
- ignoreCves: CVE IDs that will not be reported. But output to JSON file.
|
||
- optional: JSONレポートに含めたい追加情報
|
||
- containers: see [Usage: Scan Docker containers](https://github.com/future-architect/vuls/blob/master/README.ja.md#usage-scan-docker-containers)
|
||
|
||
|
||
Vulsは各サーバにSSHで接続するが、Goのネイティブ実装と、OSコマンドの2種類のSSH接続方法をサポートしている。
|
||
詳細は [-ssh-external option](https://github.com/future-architect/vuls/blob/master/README.ja.md#-ssh-external-option) を参照。
|
||
|
||
また、以下のSSH認証をサポートしている。
|
||
- SSH agent
|
||
- SSH public key authentication (with password, empty password)
|
||
SSH Password認証はサポートしていない
|
||
|
||
----
|
||
|
||
# Usage: Configtest
|
||
|
||
```
|
||
$ vuls configtest --help
|
||
configtest:
|
||
configtest
|
||
[-config=/path/to/config.toml]
|
||
[-log-dir=/path/to/log]
|
||
[-ask-key-password]
|
||
[-ssh-external]
|
||
[-http-proxy=http://192.168.0.1:8080]
|
||
[-debug]
|
||
|
||
[SERVER]...
|
||
-ask-key-password
|
||
Ask ssh privatekey password before scanning
|
||
-config string
|
||
/path/to/toml (default "/Users/kotakanbe/go/src/github.com/future-architect/vuls/config.toml")
|
||
-debug
|
||
debug mode
|
||
-http-proxy string
|
||
http://proxy-url:port (default: empty)
|
||
-log-dir string
|
||
/path/to/log (default "/var/log/vuls")
|
||
-ssh-external
|
||
Use external ssh command. Default: Use the Go native implementation
|
||
```
|
||
|
||
configtestサブコマンドは以下をチェックする
|
||
- config.tomlで定義されたサーバ/コンテナに対してSSH可能かどうか
|
||
- スキャン対象のサーバ上に依存パッケーがインストールされているか
|
||
- /etc/sudoers
|
||
|
||
## Dependencies on Target Servers
|
||
|
||
スキャンするためには、下記のパッケージが必要なので、手動かまたはAnsibleなどのツールで事前にインストールする必要がある。
|
||
|
||
| Distribution| Release | Requirements |
|
||
|:------------|-------------------:|:-------------|
|
||
| Ubuntu | 12, 14, 16| - |
|
||
| Debian | 7, 8| aptitude |
|
||
| CentOS | 6, 7| yum-plugin-changelog |
|
||
| Amazon | All | - |
|
||
| RHEL | 5 | yum-security |
|
||
| RHEL | 6, 7 | - |
|
||
| FreeBSD | 10 | - |
|
||
| Raspbian | Wheezy, Jessie | - |
|
||
|
||
## Check /etc/sudoers
|
||
|
||
スキャン対象サーバに対してパスワードなしでSUDO可能な状態かもチェックする。
|
||
スキャン対象サーバ上の`/etc/sudoers`のサンプル
|
||
|
||
- CentOS
|
||
```
|
||
vuls ALL=(ALL) NOPASSWD:/usr/bin/yum --changelog --assumeno update *
|
||
Defaults:vuls env_keep="http_proxy https_proxy HTTP_PROXY HTTPS_PROXY"
|
||
```
|
||
|
||
- RHEL 5
|
||
```
|
||
vuls ALL=(ALL) NOPASSWD:/usr/bin/yum --color=never repolist, /usr/bin/yum --color=never list-security --security, /usr/bin/yum --color=never check-update, /usr/bin/yum --color=never info-security
|
||
Defaults:vuls env_keep="http_proxy https_proxy HTTP_PROXY HTTPS_PROXY"
|
||
```
|
||
|
||
- RHEL 6, 7
|
||
```
|
||
vuls ALL=(ALL) NOPASSWD:/usr/bin/yum --color=never repolist, /usr/bin/yum --color=never --security updateinfo list updates, /usr/bin/yum --color=never check-update, /usr/bin/yum --color=never --security updateinfo updates
|
||
Defaults:vuls env_keep="http_proxy https_proxy HTTP_PROXY HTTPS_PROXY"
|
||
```
|
||
|
||
- Debian
|
||
```
|
||
vuls ALL=(ALL) NOPASSWD: /usr/bin/apt-get update
|
||
Defaults:vuls env_keep="http_proxy https_proxy HTTP_PROXY HTTPS_PROXY"
|
||
```
|
||
|
||
- Ubuntu/Raspbian
|
||
```
|
||
vuls ALL=(ALL) NOPASSWD: /usr/bin/apt-get update
|
||
Defaults:vuls env_keep="http_proxy https_proxy HTTP_PROXY HTTPS_PROXY"
|
||
```
|
||
|
||
- Amazon Linux, FreeBSDは今のところRoot権限なしでスキャン可能
|
||
|
||
----
|
||
|
||
# Usage: Scan
|
||
|
||
```
|
||
$ vuls scan -help
|
||
scan:
|
||
scan
|
||
[-config=/path/to/config.toml]
|
||
[-results-dir=/path/to/results]
|
||
[-log-dir=/path/to/log]
|
||
[-cachedb-path=/path/to/cache.db]
|
||
[-ssh-external]
|
||
[-containers-only]
|
||
[-skip-broken]
|
||
[-http-proxy=http://192.168.0.1:8080]
|
||
[-ask-key-password]
|
||
[-debug]
|
||
[-pipe]
|
||
|
||
[SERVER]...
|
||
-ask-key-password
|
||
Ask ssh privatekey password before scanning
|
||
-cachedb-path string
|
||
/path/to/cache.db (local cache of changelog for Ubuntu/Debian)
|
||
-config string
|
||
/path/to/toml
|
||
-containers-only
|
||
Scan containers only. Default: Scan both of hosts and containers
|
||
-debug
|
||
debug mode
|
||
-http-proxy string
|
||
http://proxy-url:port (default: empty)
|
||
-log-dir string
|
||
/path/to/log (default "/var/log/vuls")
|
||
-pipe
|
||
Use stdin via PIPE
|
||
-results-dir string
|
||
/path/to/results
|
||
-skip-broken
|
||
[For CentOS] yum update changelog with --skip-broken option
|
||
-ssh-external
|
||
Use external ssh command. Default: Use the Go native implementation
|
||
```
|
||
|
||
## -ssh-external option
|
||
|
||
Vulsは2種類のSSH接続方法をサポートしている。
|
||
|
||
デフォルトでは、Goのネイティブ実装 (crypto/ssh) を使ってスキャンする。
|
||
これは、SSHコマンドがインストールされていない環境でも動作する(Windowsなど)
|
||
|
||
外部SSHコマンドを使ってスキャンするためには、`-ssh-external`を指定する。
|
||
SSH Configが使えるので、ProxyCommandを使った多段SSHなどが可能。
|
||
CentOSでは、スキャン対象サーバの/etc/sudoersに以下を追加する必要がある(user: vuls)
|
||
```
|
||
Defaults:vuls !requiretty
|
||
```
|
||
|
||
## -ask-key-password option
|
||
|
||
| SSH key password | -ask-key-password | |
|
||
|:-----------------|:-------------------|:----|
|
||
| empty password | - | |
|
||
| with password | required | or use ssh-agent |
|
||
|
||
## Example: Scan all servers defined in config file
|
||
```
|
||
$ vuls scan -ask-key-password
|
||
```
|
||
この例では、
|
||
- SSH公開鍵認証(秘密鍵パスフレーズ)を指定
|
||
- configに定義された全サーバをスキャン
|
||
|
||
## Example: Scan specific servers
|
||
```
|
||
$ vuls scan server1 server2
|
||
```
|
||
この例では、
|
||
- SSH公開鍵認証(秘密鍵パスフレーズなし)
|
||
- ノーパスワードでsudoが実行可能
|
||
- configで定義されているサーバの中の、server1, server2のみスキャン
|
||
|
||
## Example: Scan via shell instead of SSH.
|
||
|
||
ローカルホストのスキャンする場合、SSHではなく直接コマンドの発行が可能。
|
||
config.tomlのhostに`localhost または 127.0.0.1`かつ、portに`local`を設定する必要がある。
|
||
For more details, see [Architecture section](https://github.com/future-architect/vuls#architecture)
|
||
|
||
- config.toml
|
||
```
|
||
[servers]
|
||
|
||
[servers.localhost]
|
||
host = "localhost" # or "127.0.0.1"
|
||
port = "local"
|
||
```
|
||
|
||
### cronで動かす場合
|
||
|
||
RHEL/CentOSの場合、スキャン対象サーバの/etc/sudoersに以下を追加する必要がある。(user: vuls)
|
||
```
|
||
Defaults:vuls !requiretty
|
||
```
|
||
|
||
## Example: Scan containers (Docker/LXD)
|
||
|
||
|
||
コンテナはSSHデーモンを起動しないで運用するケースが一般的。
|
||
[Docker Blog:Why you don't need to run SSHd in your Docker containers](https://blog.docker.com/2014/06/why-you-dont-need-to-run-sshd-in-docker/)
|
||
|
||
### Docker
|
||
|
||
Vulsは、DockerホストにSSHで接続し、`docker exec`でDockerコンテナにコマンドを発行して脆弱性をスキャンする。
|
||
詳細は、[Architecture section](https://github.com/future-architect/vuls#architecture)を参照
|
||
|
||
- 全ての起動中のDockerコンテナをスキャン
|
||
`"${running}"` をcontainersに指定する
|
||
```
|
||
[servers]
|
||
|
||
[servers.172-31-4-82]
|
||
host = "172.31.4.82"
|
||
user = "ec2-user"
|
||
keyPath = "/home/username/.ssh/id_rsa"
|
||
|
||
[servers.172-31-4-82.containers]
|
||
includes = ["${running}"]
|
||
```
|
||
|
||
- あるコンテナのみスキャン
|
||
コンテナID、または、コンテナ名を、containersに指定する。
|
||
以下の例では、`container_name_a`と、`4aa37a8b63b9`のコンテナのみスキャンする
|
||
スキャン実行前に、コンテナが起動中か確認すること。もし起動してない場合はエラーメッセージを出力してスキャンを中断する。
|
||
```
|
||
[servers]
|
||
|
||
[servers.172-31-4-82]
|
||
host = "172.31.4.82"
|
||
user = "ec2-user"
|
||
keyPath = "/home/username/.ssh/id_rsa"
|
||
|
||
[servers.172-31-4-82.containers]
|
||
includes = ["container_name_a", "4aa37a8b63b9"]
|
||
```
|
||
|
||
- あるコンテナ以外をスキャン
|
||
```
|
||
[servers]
|
||
|
||
[servers.172-31-4-82]
|
||
host = "172.31.4.82"
|
||
user = "ec2-user"
|
||
keyPath = "/home/username/.ssh/id_rsa"
|
||
|
||
[servers.172-31-4-82.containers]
|
||
includes = ["${running}"]
|
||
excludes = ["container_name_a", "4aa37a8b63b9"]
|
||
```
|
||
|
||
- コンテナのみをスキャンする場合(ホストはスキャンしない)
|
||
--containers-onlyオプションを指定する
|
||
|
||
### LXDコンテナをスキャンする場合
|
||
|
||
Vulsは、ホストにSSHで接続し、`lxc exec`でLXDコンテナにコマンドを発行して脆弱性をスキャンする。
|
||
```
|
||
[servers]
|
||
|
||
[servers.172-31-4-82]
|
||
host = "172.31.4.82"
|
||
user = "ec2-user"
|
||
keyPath = "/home/username/.ssh/id_rsa"
|
||
|
||
[servers.172-31-4-82.containers]
|
||
type = "lxd"
|
||
includes = ["${running}"]
|
||
```
|
||
|
||
# Usage: Report
|
||
|
||
```
|
||
report:
|
||
report
|
||
[-lang=en|ja]
|
||
[-config=/path/to/config.toml]
|
||
[-results-dir=/path/to/results]
|
||
[-log-dir=/path/to/log]
|
||
[-refresh-cve]
|
||
[-cvedb-type=sqlite3|mysql]
|
||
[-cvedb-path=/path/to/cve.sqlite3]
|
||
[-cvedb-url=http://127.0.0.1:1323 or mysql connection string]
|
||
[-cvss-over=7]
|
||
[-ignore-unscored-cves]
|
||
[-to-email]
|
||
[-to-slack]
|
||
[-to-localfile]
|
||
[-to-s3]
|
||
[-to-azure-blob]
|
||
[-format-json]
|
||
[-format-xml]
|
||
[-format-one-email]
|
||
[-format-one-line-text]
|
||
[-format-short-text]
|
||
[-format-full-text]
|
||
[-gzip]
|
||
[-aws-profile=default]
|
||
[-aws-region=us-west-2]
|
||
[-aws-s3-bucket=bucket_name]
|
||
[-azure-account=accout]
|
||
[-azure-key=key]
|
||
[-azure-container=container]
|
||
[-http-proxy=http://192.168.0.1:8080]
|
||
[-debug]
|
||
[-debug-sql]
|
||
[-pipe]
|
||
|
||
[SERVER]...
|
||
-aws-profile string
|
||
AWS profile to use (default "default")
|
||
-aws-region string
|
||
AWS region to use (default "us-east-1")
|
||
-aws-s3-bucket string
|
||
S3 bucket name
|
||
-azure-account string
|
||
Azure account name to use. AZURE_STORAGE_ACCOUNT environment variable is used if not specified
|
||
-azure-container string
|
||
Azure storage container name
|
||
-azure-key string
|
||
Azure account key to use. AZURE_STORAGE_ACCESS_KEY environment variable is used if not specified
|
||
-config string
|
||
/path/to/toml
|
||
-cvedb-path string
|
||
/path/to/sqlite3 (For get cve detail from cve.sqlite3)
|
||
-cvedb-type string
|
||
DB type for fetching CVE dictionary (sqlite3 or mysql) (default "sqlite3")
|
||
-cvedb-url string
|
||
http://cve-dictionary.com:8080 or mysql connection string
|
||
-cvss-over float
|
||
-cvss-over=6.5 means reporting CVSS Score 6.5 and over (default: 0 (means report all))
|
||
-debug
|
||
debug mode
|
||
-debug-sql
|
||
SQL debug mode
|
||
-format-full-text
|
||
Detail report in plain text
|
||
-format-json
|
||
JSON format
|
||
-format-one-email
|
||
Send all the host report via only one EMail (Specify with -to-email)
|
||
-format-one-line-text
|
||
One line summary in plain text
|
||
-format-short-text
|
||
Summary in plain text
|
||
-format-xml
|
||
XML format
|
||
-gzip
|
||
gzip compression
|
||
-http-proxy string
|
||
http://proxy-url:port (default: empty)
|
||
-ignore-unscored-cves
|
||
Don't report the unscored CVEs
|
||
-lang string
|
||
[en|ja] (default "en")
|
||
-log-dir string
|
||
/path/to/log (default "/var/log/vuls")
|
||
-pipe
|
||
Use stdin via PIPE
|
||
-refresh-cve
|
||
Refresh CVE information in JSON file under results dir
|
||
-results-dir string
|
||
/path/to/results
|
||
-to-azure-blob
|
||
Write report to Azure Storage blob (container/yyyyMMdd_HHmm/servername.json/xml/txt)
|
||
-to-email
|
||
Send report via Email
|
||
-to-localfile
|
||
Write report to localfile
|
||
-to-s3
|
||
Write report to S3 (bucket/yyyyMMdd_HHmm/servername.json/xml/txt)
|
||
-to-slack
|
||
Send report via Slack
|
||
```
|
||
|
||
## How to read a report
|
||
|
||
### Example
|
||
|
||
```
|
||
$ vuls report -format-full-text
|
||
|
||
172-31-4-82 (amazon 2015.09)
|
||
============================
|
||
Total: 94 (High:19 Medium:54 Low:7 ?:14) 103 updatable packages
|
||
|
||
CVE-2016-5636
|
||
-------------
|
||
Score 10.0 (High)
|
||
Vector (AV:N/AC:L/Au:N/C:C/I:C/A:C)
|
||
Summary Integer overflow in the get_data function in zipimport.c in CPython (aka Python)
|
||
before 2.7.12, 3.x before 3.4.5, and 3.5.x before 3.5.2 allows remote attackers
|
||
to have unspecified impact via a negative data size value, which triggers a
|
||
heap-based buffer overflow.
|
||
CWE https://cwe.mitre.org/data/definitions/190.html
|
||
NVD https://web.nvd.nist.gov/view/vuln/detail?vulnId=CVE-2016-5636
|
||
MITRE https://cve.mitre.org/cgi-bin/cvename.cgi?name=CVE-2016-5636
|
||
CVE Details http://www.cvedetails.com/cve/CVE-2016-5636
|
||
CVSS Claculator https://nvd.nist.gov/cvss/v2-calculator?name=CVE-2016-5636&vector=(AV:N/AC:L/...
|
||
RHEL-CVE https://access.redhat.com/security/cve/CVE-2016-5636
|
||
ALAS-2016-724 https://alas.aws.amazon.com/ALAS-2016-724.html
|
||
Package python27-2.7.10-4.119.amzn1 -> python27-2.7.12-2.120.amzn1
|
||
python27-devel-2.7.10-4.119.amzn1 -> python27-devel-2.7.12-2.120.amzn1
|
||
python27-libs-2.7.10-4.119.amzn1 -> python27-libs-2.7.12-2.120.amzn1
|
||
Confidence 100 / YumUpdateSecurityMatch
|
||
|
||
... snip ...
|
||
```
|
||
|
||
### Summary part
|
||
|
||
```
|
||
172-31-4-82 (amazon 2015.09)
|
||
============================
|
||
Total: 94 (High:19 Medium:54 Low:7 ?:14) 103 updatable packages
|
||
```
|
||
|
||
- `172-31-4-82` means that it is a scan report of `servers.172-31-4-82` defined in cocnfig.toml.
|
||
- `(amazon 2015.09)` means that the version of the OS is Amazon Linux 2015.09.
|
||
- `Total: 94 (High:19 Medium:54 Low:7 ?:14)` means that a total of 94 vulnerabilities exist, and the distribution of CVSS Severity is displayed.
|
||
- `103 updatable packages` means that there are 103 updateable packages on the target server.
|
||
|
||
### Detailed Part
|
||
|
||
```
|
||
CVE-2016-5636
|
||
-------------
|
||
Score 10.0 (High)
|
||
Vector (AV:N/AC:L/Au:N/C:C/I:C/A:C)
|
||
Summary Integer overflow in the get_data function in zipimport.c in CPython (aka Python)
|
||
before 2.7.12, 3.x before 3.4.5, and 3.5.x before 3.5.2 allows remote attackers
|
||
to have unspecified impact via a negative data size value, which triggers a
|
||
heap-based buffer overflow.
|
||
CWE https://cwe.mitre.org/data/definitions/190.html
|
||
NVD https://web.nvd.nist.gov/view/vuln/detail?vulnId=CVE-2016-5636
|
||
MITRE https://cve.mitre.org/cgi-bin/cvename.cgi?name=CVE-2016-5636
|
||
CVE Details http://www.cvedetails.com/cve/CVE-2016-5636
|
||
CVSS Claculator https://nvd.nist.gov/cvss/v2-calculator?name=CVE-2016-5636&vector=(AV:N/AC:L/...
|
||
RHEL-CVE https://access.redhat.com/security/cve/CVE-2016-5636
|
||
ALAS-2016-724 https://alas.aws.amazon.com/ALAS-2016-724.html
|
||
Package python27-2.7.10-4.119.amzn1 -> python27-2.7.12-2.120.amzn1
|
||
python27-devel-2.7.10-4.119.amzn1 -> python27-devel-2.7.12-2.120.amzn1
|
||
python27-libs-2.7.10-4.119.amzn1 -> python27-libs-2.7.12-2.120.amzn1
|
||
Confidence 100 / YumUpdateSecurityMatch
|
||
```
|
||
|
||
- `Score` means CVSS Score.
|
||
- `Vector` means [CVSS Vector](https://nvd.nist.gov/CVSS/Vector-v2.aspx)
|
||
- `Summary` means Summary of the CVE.
|
||
- `CWE` means [CWE - Common Weakness Enumeration](https://nvd.nist.gov/cwe.cfm) of the CVE.
|
||
- `NVD` `MITRE` `CVE Details` `CVSS Caluculator`
|
||
- `RHEL-CVE` means the URL of OS distributor support.
|
||
- `Package` shows the package version information including this vulnerability.
|
||
- `Confidence` means the reliability of detection.
|
||
- `100` is highly reliable
|
||
- `YumUpdateSecurityMatch` is the method of detecting this vulnerability.
|
||
- Item list of `Confidence`
|
||
|
||
| Detection Method | Confidence | OS |Description|
|
||
|:-----------------------|-------------------:|:---------------------------------|:--|
|
||
| YumUpdateSecurityMatch | 100 | RHEL, Amazon Linux |Detection using yum-plugin-security|
|
||
| ChangelogExactMatch | 95 | CentOS, Ubuntu, Debian, Raspbian |Exact version match between changelog and package version|
|
||
| ChangelogLenientMatch | 50 | Ubuntu, Debian, Raspbian |Lenient version match between changelog and package version|
|
||
| PkgAuditMatch | 100 | FreeBSD |Detection using pkg audit|
|
||
| CpeNameMatch | 100 | All |Search for NVD information with CPE name specified in config.toml|
|
||
|
||
|
||
### Changelog Part
|
||
|
||
The scan results of Ubuntu, Debian, Raspbian or CentOS are also output Changelog in TUI or report with -format-full-text.
|
||
(RHEL, Amazon or FreeBSD will be available in the near future)
|
||
|
||
The output change log includes only the difference between the currently installed version and candidate version.
|
||
|
||
```
|
||
tar-1.28-2.1 -> tar-1.28-2.1ubuntu0.1
|
||
-------------------------------------
|
||
tar (1.28-2.1ubuntu0.1) xenial-security; urgency=medium
|
||
|
||
* SECURITY UPDATE: extract pathname bypass
|
||
- debian/patches/CVE-2016-6321.patch: skip members whose names contain
|
||
".." in src/extract.c.
|
||
- CVE-2016-6321
|
||
|
||
-- Marc Deslauriers <marc.deslauriers@ubuntu.com> Thu, 17 Nov 2016 11:06:07 -0500
|
||
```
|
||
|
||
|
||
## Example: Send scan results to Slack
|
||
```
|
||
$ vuls report \
|
||
-to-slack \
|
||
-cvss-over=7 \
|
||
-cvedb-path=$PWD/cve.sqlite3
|
||
```
|
||
With this sample command, it will ..
|
||
- Slack通知
|
||
- CVSS score が 7.0以上のもののみ通知
|
||
|
||
|
||
## Example: Put results in S3 bucket
|
||
|
||
事前にAWS関連の設定を行う
|
||
- S3バケットを作成 [Creating a Bucket](http://docs.aws.amazon.com/AmazonS3/latest/UG/CreatingaBucket.html)
|
||
- いずれかの方法でS3リソースへアクセスする設定を行う
|
||
- 環境変数を設定 [Configuring the AWS Command Line Interface](http://docs.aws.amazon.com/cli/latest/userguide/cli-chap-getting-started.html)
|
||
- Security Credentialsを設定 [Configuring the AWS Command Line Interface](http://docs.aws.amazon.com/cli/latest/userguide/cli-chap-getting-started.html)
|
||
- サービス用のIAMロールを作成し、サービス(EC2, AWS Lambda)にアタッチ [Creating a Role to Delegate Permissions to an AWS Service](http://docs.aws.amazon.com/IAM/latest/UserGuide/id_roles_create_for-service.html)
|
||
- 環境変数、Security Credentialsを設定する場合はアクセスキーを作成する [Managing Access Keys for IAM Users](http://docs.aws.amazon.com/IAM/latest/UserGuide/id_credentials_access-keys.html)
|
||
|
||
IAMポリシーの例:
|
||
|
||
```
|
||
{
|
||
"Version": "2012-10-17",
|
||
"Statement": [
|
||
{
|
||
"Effect": "Allow",
|
||
"Action": [
|
||
"s3:ListAllMyBuckets"
|
||
],
|
||
"Resource": "arn:aws:s3:::*"
|
||
},
|
||
{
|
||
"Effect": "Allow",
|
||
"Action": [
|
||
"s3:PutObject"
|
||
],
|
||
"Resource": "arn:aws:s3:::vuls/*"
|
||
}
|
||
]
|
||
}
|
||
```
|
||
|
||
```
|
||
$ vuls scan \
|
||
-cvedb-path=$PWD/cve.sqlite3 \
|
||
-to-s3 \
|
||
-format-json \
|
||
-aws-region=ap-northeast-1 \
|
||
-aws-s3-bucket=vuls \
|
||
-aws-profile=default
|
||
```
|
||
この例では、
|
||
- 結果をJSON形式でS3に格納する。
|
||
- バケット名 ... vuls
|
||
- リージョン ... ap-northeast-1
|
||
- 利用するProfile ... default
|
||
|
||
## Example: Put results in Azure Blob storage
|
||
|
||
事前にAzure Blob関連の設定を行う
|
||
- Azure Blob Containerを作成
|
||
|
||
```
|
||
$ vuls scan \
|
||
-cvedb-path=$PWD/cve.sqlite3 \
|
||
-to-azure-blob \
|
||
-format-xml \
|
||
-azure-container=vuls \
|
||
-azure-account=test \
|
||
-azure-key=access-key-string
|
||
```
|
||
この例では、
|
||
- 結果をXML形式でBlobに格納する。
|
||
- コンテナ名 ... vuls
|
||
- ストレージアカウント名 ... test
|
||
- アクセスキー ... access-key-string
|
||
|
||
また、アカウント名とアクセスキーは環境変数でも定義が可能
|
||
```
|
||
$ export AZURE_STORAGE_ACCOUNT=test
|
||
$ export AZURE_STORAGE_ACCESS_KEY=access-key-string
|
||
$ vuls scan \
|
||
-cve-dictionary-dbpath=$PWD/cve.sqlite3 \
|
||
-report-azure-blob \
|
||
-azure-container=vuls
|
||
```
|
||
|
||
## Example: IgnoreCves
|
||
|
||
Slack, EMail, テキスト出力しないくないCVE IDがある場合は、設定ファイルに定義することでレポートされなくなる。
|
||
ただ、JSONファイルには以下のように出力される。
|
||
|
||
- config.toml
|
||
```toml
|
||
[default]
|
||
ignoreCves = ["CVE-2016-6313"]
|
||
|
||
[servers.bsd]
|
||
host = "192.168.11.11"
|
||
user = "kanbe"
|
||
ignoreCves = ["CVE-2016-6314"]
|
||
```
|
||
|
||
- bsd.json
|
||
```json
|
||
[
|
||
{
|
||
"ServerName": "bsd",
|
||
"Family": "FreeBSD",
|
||
"Release": "10.3-RELEASE",
|
||
"IgnoredCves" : [
|
||
"CveDetail" : {
|
||
"CVE-2016-6313",
|
||
...
|
||
},
|
||
"CveDetail" : {
|
||
"CVE-2016-6314",
|
||
...
|
||
}
|
||
]
|
||
}
|
||
]
|
||
```
|
||
|
||
## Example: Add optional key-value pairs to JSON
|
||
|
||
追加情報をJSONに含めることができる。
|
||
デフォルトセクションのkey-valueはserversセクションのもので上書きされる。
|
||
使い方の例として、AzureリソースグループやVM名を指定しておくことで、結果のJSONをスクリプトでパースしてAzure VMの操作をする、などが可能。
|
||
|
||
- config.toml
|
||
```toml
|
||
[default]
|
||
optional = [
|
||
["key1", "default_value"],
|
||
["key3", "val3"],
|
||
]
|
||
|
||
[servers.bsd]
|
||
host = "192.168.11.11"
|
||
user = "kanbe"
|
||
optional = [
|
||
["key1", "val1"],
|
||
["key2", "val2"],
|
||
]
|
||
```
|
||
|
||
- bsd.json
|
||
```json
|
||
[
|
||
{
|
||
"ServerName": "bsd",
|
||
"Family": "FreeBSD",
|
||
"Release": "10.3-RELEASE",
|
||
.... snip ...
|
||
"Optional": [
|
||
[ "key1", "val1" ],
|
||
[ "key2", "val2" ],
|
||
[ "key3", "val3" ]
|
||
]
|
||
}
|
||
]
|
||
```
|
||
|
||
## Example: Use MySQL as a DB storage back-end
|
||
|
||
```
|
||
$ vuls report \
|
||
-cvedb-type=mysql \
|
||
-cvedb-url="user:pass@tcp(localhost:3306)/dbname"
|
||
```
|
||
|
||
----
|
||
|
||
# Usage: Scan vulnerability of non-OS package
|
||
|
||
Vulsは、[CPE](https://nvd.nist.gov/cpe.cfm)に登録されているソフトウェアであれば、OSパッケージ以外のソフトウェアの脆弱性もスキャン可能。
|
||
たとえば、自分でコンパイルしたものや、言語のライブラリ、フレームワークなど。
|
||
|
||
- CPEの検索方法
|
||
- [NVD: Search Common Platform Enumerations (CPE)](https://web.nvd.nist.gov/view/cpe/search)
|
||
**Check CPE Naming Format: 2.2**
|
||
|
||
- [go-cpe-dictionary](https://github.com/kotakanbe/go-cpe-dictionary) is a good choice for geeks.
|
||
ターミナル上でCPEをインクリメンタル検索出来るツール
|
||
|
||
- Configuration
|
||
例えば、Ruby on Rails v4.2.1の脆弱性を検知したい場合は、serversセクションに以下のように定義する。
|
||
```
|
||
[servers]
|
||
|
||
[servers.172-31-4-82]
|
||
host = "172.31.4.82"
|
||
user = "ec2-user"
|
||
keyPath = "/home/username/.ssh/id_rsa"
|
||
cpeNames = [
|
||
"cpe:/a:rubyonrails:ruby_on_rails:4.2.1",
|
||
]
|
||
```
|
||
|
||
|
||
# Usage: Integrate with OWASP Dependency Check to Automatic update when the libraries are updated (Experimental)
|
||
[OWASP Dependency check](https://www.owasp.org/index.php/OWASP_Dependency_Check) は、プログラミング言語のライブラリを特定し(CPEを推測)、公開済みの脆弱性を検知するツール。
|
||
|
||
VulsとDependency Checkを連携させる方法は以下
|
||
- Dependency Checkを、--format=XMLをつけて実行する
|
||
- そのXMLをconfig.toml内で以下のように定義する
|
||
|
||
```
|
||
[servers]
|
||
|
||
[servers.172-31-4-82]
|
||
host = "172.31.4.82"
|
||
user = "ec2-user"
|
||
keyPath = "/home/username/.ssh/id_rsa"
|
||
dependencyCheckXMLPath = "/tmp/dependency-check-report.xml"
|
||
```
|
||
|
||
VulsとDependency Checkを連携すると以下の利点がある
|
||
- ライブラリを更新した場合に、config.tomlのCPEの定義を変更しなくても良い
|
||
- Vulsの機能でSlack, Emailで通知可能
|
||
- 日本語のレポートが可能
|
||
- Dependency Checkは日本語レポートに対応していない
|
||
|
||
|
||
# Usage: TUI
|
||
|
||
## Display the latest scan results
|
||
|
||
```
|
||
$ vuls tui -h
|
||
tui:
|
||
tui
|
||
[-cvedb-type=sqlite3|mysql]
|
||
[-cvedb-path=/path/to/cve.sqlite3]
|
||
[-cvedb-url=http://127.0.0.1:1323 or mysql connection string]
|
||
[-results-dir=/path/to/results]
|
||
[-refresh-cve]
|
||
[-debug-sql]
|
||
[-pipe]
|
||
|
||
-cvedb-path string
|
||
/path/to/sqlite3 (For get cve detail from cve.sqlite3)
|
||
-cvedb-type string
|
||
DB type for fetching CVE dictionary (sqlite3 or mysql)
|
||
-cvedb-url string
|
||
http://cve-dictionary.com:8080 or mysql connection string
|
||
-debug-sql
|
||
debug SQL
|
||
-pipe
|
||
Use stdin via PIPE
|
||
-refresh-cve
|
||
Refresh CVE information in JSON file under results dir
|
||
-results-dir string
|
||
/path/to/results
|
||
```
|
||
|
||
Key binding is below.
|
||
|
||
| key | |
|
||
|:-----------------|:-------|
|
||
| TAB | move cursor among the panes |
|
||
| Arrow up/down | move cursor to up/down |
|
||
| Ctrl+j, Ctrl+k | move cursor to up/down |
|
||
| Ctrl+u, Ctrl+d | page up/down |
|
||
|
||
For details, see https://github.com/future-architect/vuls/blob/master/report/tui.go
|
||
|
||
## Display the previous scan results
|
||
|
||
- Display the list of scan results.
|
||
```
|
||
$ vuls history
|
||
20160524_1950 scanned 1 servers: amazon2
|
||
20160524_1940 scanned 2 servers: amazon1, romantic_goldberg
|
||
```
|
||
|
||
- Display the result of scan 20160524_1949
|
||
```
|
||
$ vuls tui 20160524_1950
|
||
```
|
||
|
||
- Display the result of scan 20160524_1948
|
||
```
|
||
$ vuls tui 20160524_1940
|
||
```
|
||
|
||
# Display the previous scan results using peco
|
||
|
||
```
|
||
$ vuls history | peco | vuls tui -pipe
|
||
```
|
||
|
||
[](https://asciinema.org/a/emi7y7docxr60bq080z10t7v8)
|
||
|
||
# Usage: go-cve-dictonary on different server
|
||
|
||
Run go-cve-dictionary as server mode before scanning on 192.168.10.1
|
||
```
|
||
$ go-cve-dictionary server -bind=192.168.10.1 -port=1323
|
||
```
|
||
|
||
Run Vuls with -cve-dictionary-url option.
|
||
|
||
```
|
||
$ vuls scan -cve-dictionary-url=http://192.168.0.1:1323
|
||
```
|
||
|
||
# Usage: Update NVD Data
|
||
|
||
see [go-cve-dictionary#usage-fetch-nvd-data](https://github.com/kotakanbe/go-cve-dictionary#usage-fetch-nvd-data)
|
||
|
||
----
|
||
|
||
# レポートの日本語化
|
||
|
||
see [go-cve-dictionary#usage-fetch-jvn-data](https://github.com/kotakanbe/go-cve-dictionary#usage-fetch-jvn-data)
|
||
|
||
|
||
## fetchnvd, fetchjvnの実行順序の注意
|
||
|
||
**fetchjvn -> fetchnvdの順番だとすごく時間がかかる** (2016年9月現在)
|
||
**fetchnvd -> fetchjvnの順番で実行すること**
|
||
|
||
```
|
||
$ for i in `seq 2002 $(date +"%Y")`; do go-cve-dictionary fetchnvd -years $i; done
|
||
$ for i in `seq 1998 $(date +"%Y")`; do go-cve-dictionary fetchjvn -years $i; done
|
||
```
|
||
の順でやった場合、最初のコマンドが15分程度、二つ目のコマンドが10分程度(環境依存)
|
||
|
||
|
||
```
|
||
$ for i in `seq 1998 $(date +"%Y")`; do go-cve-dictionary fetchjvn -years $i; done
|
||
$ for i in `seq 2002 $(date +"%Y")`; do go-cve-dictionary fetchnvd -years $i; done
|
||
```
|
||
の順で行うと、最初のコマンドは1時間くらいで終わるが二つ目のコマンドが21時間かかることもある(環境依存)。
|
||
|
||
|
||
## スキャン実行
|
||
|
||
```
|
||
$ vuls scan -lang=ja
|
||
```
|
||
Scan時にlang=jaを指定すると脆弱性レポートが日本語になる
|
||
slack, emailは日本語対応済み TUIは日本語表示未対応
|
||
|
||
----
|
||
|
||
# Update Vuls With Glide
|
||
|
||
- Update go-cve-dictionary
|
||
If the DB schema was changed, please specify new SQLite3 or MySQL DB file.
|
||
```
|
||
$ cd $GOPATH/src/github.com/kotakanbe/go-cve-dictionary
|
||
$ git pull
|
||
$ mv vendor /tmp/foo
|
||
$ make install
|
||
```
|
||
|
||
- Update vuls
|
||
```
|
||
$ cd $GOPATH/src/github.com/future-architect/vuls
|
||
$ git pull
|
||
$ mv vendor /tmp/bar
|
||
$ make install
|
||
```
|
||
- バイナリファイルは`$GOPATH/bin`以下に作成される
|
||
|
||
---
|
||
|
||
# Misc
|
||
|
||
- go get時にエラーが出る
|
||
Gitをv2にアップデートしてお試しを
|
||
see https://groups.google.com/forum/#!topic/mgo-users/rO1-gUDFo_g
|
||
|
||
- HTTP Proxy サポート
|
||
プロキシ環境下では、-http-proxyオプションを指定
|
||
|
||
- go-cve-dictionaryのデーモン化
|
||
Use Systemd, Upstart or supervisord, daemontools...
|
||
|
||
- NVD, JVNの脆弱性データベースの自動更新
|
||
CRONなどを使えば可能
|
||
|
||
- 自動定期スキャン
|
||
CRONなどを使い、自動化のためにsudoと、秘密鍵のパスワードなしでも実行可能なようにする
|
||
- スキャン対象サーバの /etc/sudoers に NOPASSWORD を設定する
|
||
- 秘密鍵パスフレーズなしの公開鍵認証か、ssh-agentを使う
|
||
|
||
- スキャンが重く感じる
|
||
vulsのスキャン対象に脆弱性が溜まりすぎると実行時間が長くなります
|
||
脆弱性のある状態は溜めすぎないようにしましょう
|
||
|
||
- クロスコンパイル
|
||
```bash
|
||
$ cd /path/to/your/local-git-reporsitory/vuls
|
||
$ GOOS=linux GOARCH=amd64 go build -o vuls.amd64
|
||
```
|
||
|
||
- Logging
|
||
Log is under /var/log/vuls/
|
||
|
||
- Debug
|
||
Run with --debug, --sql-debug option.
|
||
|
||
- Adjusting Open File Limit
|
||
[Riak docs](http://docs.basho.com/riak/latest/ops/tuning/open-files-limit/) is awesome.
|
||
|
||
- Does Vuls accept ssh connections with fish-shell or old zsh as the login shell?
|
||
No, Vuls needs a user on the server for bash login. see also [#8](/../../issues/8)
|
||
|
||
- Windows
|
||
Use Microsoft Baseline Security Analyzer. [MBSA](https://technet.microsoft.com/en-us/security/cc184924.aspx)
|
||
|
||
----
|
||
|
||
# Related Projects
|
||
|
||
- [k1LoW/ssh_config_to_vuls_config](https://github.com/k1LoW/ssh_config_to_vuls_config)
|
||
ssh_config to vuls config TOML format
|
||
|
||
- [usiusi360/vulsrepo](https://github.com/usiusi360/vulsrepo)
|
||
VulsRepo is visualized based on the json report output in vuls.
|
||
Youtube
|
||
[](https://www.youtube.com/watch?v=DIBPoik4owc)
|
||
|
||
|
||
----
|
||
|
||
# Data Source
|
||
|
||
- [NVD](https://nvd.nist.gov/)
|
||
- [JVN(Japanese)](http://jvndb.jvn.jp/apis/myjvn/)
|
||
|
||
|
||
# Authors
|
||
|
||
kotakanbe ([@kotakanbe](https://twitter.com/kotakanbe)) created vuls and [these fine people](https://github.com/future-architect/vuls/graphs/contributors) have contributed.
|
||
|
||
----
|
||
|
||
# Contribute
|
||
|
||
1. fork a repository: github.com/future-architect/vuls to github.com/you/repo
|
||
2. get original code: go get github.com/future-architect/vuls
|
||
3. work on original code
|
||
4. add remote to your repo: git remote add myfork https://github.com/you/repo.git
|
||
5. push your changes: git push myfork
|
||
6. create a new Pull Request
|
||
|
||
- see [GitHub and Go: forking, pull requests, and go-getting](http://blog.campoy.cat/2014/03/github-and-go-forking-pull-requests-and.html)
|
||
|
||
----
|
||
|
||
# Change Log
|
||
|
||
Please see [CHANGELOG](https://github.com/future-architect/vuls/blob/master/CHANGELOG.md).
|
||
|
||
----
|
||
|
||
# License
|
||
|
||
Please see [LICENSE](https://github.com/future-architect/vuls/blob/master/LICENSE).
|